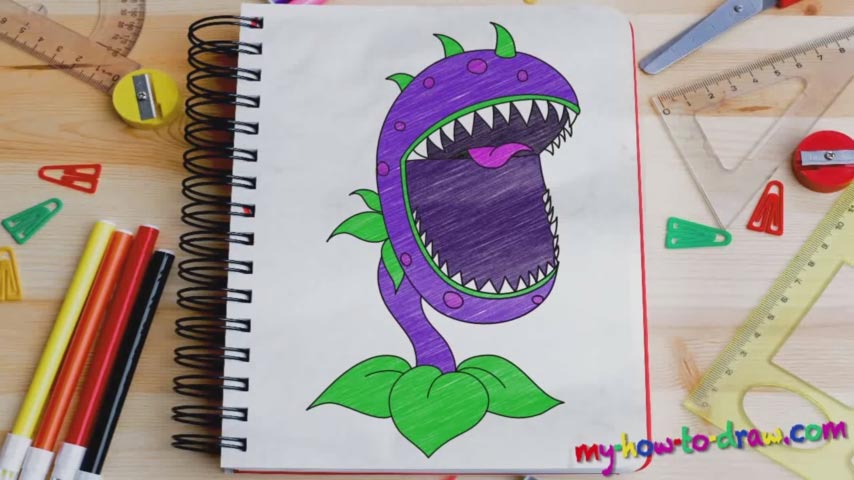
Learn How to Draw Plants Vs Zombies Chomper Quickly & Easily!
Unlike the other PVZ videos that are present on our website, this lovely character is relatively easy to draw. The rough sketch should begin with the big circle that represents the upper jaw (00 min 36 sec). The smaller one right below it should overlap a bit and define the lower part of the head.
Once you’re done with the lines inside the head, move on to the bottom of the paper (01 min 30 sec). The stem and the flowers are the easiest part of this drawing, by the way. All good, ready to go all in? Great, let’s move on to the next stage of our how to draw Plants Vs Zombies Chomper tutorial. Use darker strokes to create the upper part of the head (02 min 16 sec).
Don’t forget about the three spikes on top of it. Next, draw a series of intimidating teeth starting from the right corner all the way to the left one (02 min 51 sec). After that, use the guiding lines and draw the super-smooth lower jaw (03 min 11 sec). It also comes with teeth, but they’re a bit smaller than the upper ones. Complete the mouth by adding more teeth and drawing the tongue (04 min 12 sec).
This is the most fun part of this how to draw Plants Vs Zombies Chomper tutorial. If you’re happy with the result, finish the head (add those cute dots all over it) and move on to the bottom (04 min 57 sec). The three tiny flowers on the side should be followed by the bigger ones that form the foundation. Connect them with the head using the stem and that’s it (06 min 12 sec)!
Before you learn how to draw Plants Vs Zombies Chomper, did you know?
It’s big, looks ugly and causes a lot of trouble. But that’s only if you’re on the Zombies team. If you’re with the Plants, this impressive plant will be one of your best assets on the field. It can swallow most of the zombies and kill them in one deadly blow.