Learn How To Draw A Ladybug Quickly
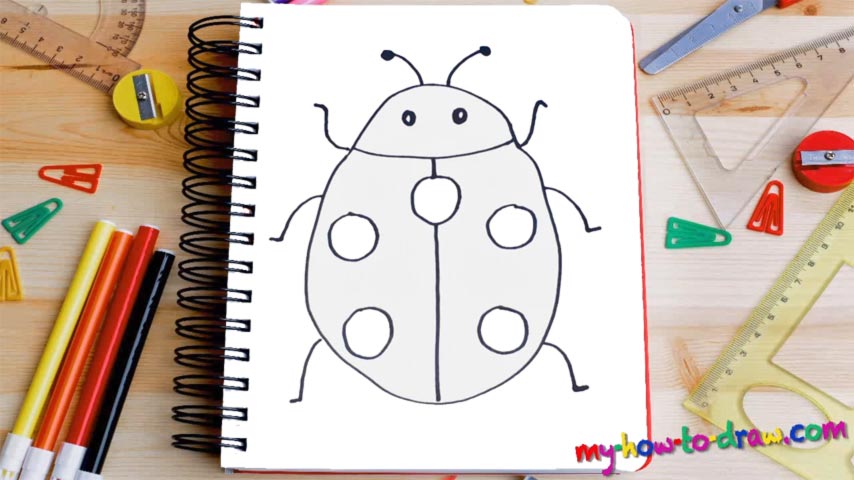
This is one of the most fun and accessible tutorials on our website, give or take. The main body of the insect looks like something between a rock and an egg (00 min 06 sec). Put it in first and pay extra attention to the curves. They must be round, but the entire thing shouldn’t be perfectly-smooth; you’ll ruin everything if you do that.
This is the intro to the how to draw a Ladybug tutorial, and once it’s done, you can move on and add that horizontal curve that separates the head from the rest (00 min 19 sec). Happy with it? Good, then go ahead and create a straight vertical line that divides the body into two parts. Can you see those circles all over the bug? That pattern is its trademark “fashion choice”; so, put five round shapes in before getting to the next stage.
Moving on with the how to draw a Ladybug tutorial, create two tiny ovals for the eyes and two funny antennas on top of its head (00 min 45 sec). The limbs are the last things to take care of before finishing this video guide (01 min 00 sec). Overall, we’ve got six of those: four in the upper corner, and two in the lower corner. Looks cute, doesn’t it?
Before you learn how to draw A Ladybug, did you know?
Despite the fact that the majority of humans don’t really like insects, these cute bugs are loved and cherished around the world. During the harsh winter days, they hide under the leaves and/or in the grass. As for the rest of the year, the ladybugs use it to hunt and feed.
The red, orange and yellow “patterns” are the most popular ones, and they give these bugs a very welcoming look. The agricultural industry considers them to be close friends, as they prey on a number of parasites that would otherwise devastate the crops. However, when the wasps, their biggest enemies, are not around, the ladybugs turn into a huge problem.